Many posts on my blog are about how I’ve screwed up. Which, if you think about it, is where a lot of the fun in life happens for everyone. I’m just sayin’. Anyway, sometimes I get it right. This time I hit a home run.
I had to face the eternal challenge of motorcycles; “how does one carry stuff on in a way that’s waterproof, impact resistant, convenient, and well balanced… oh yeah, and do it cheap”. I came up with a solution that totally rocks!
I decided to repurpose Milwaukee Packout toolboxes. I’m happy as a pig in shit with my clever little idea! It’s cheaper than virtually any commercial motorcycle stuff, modular, tough, allows easy access, it’s lockable, and even looks OK. In my humble opinion, it’s better than something that would cost five times as much.
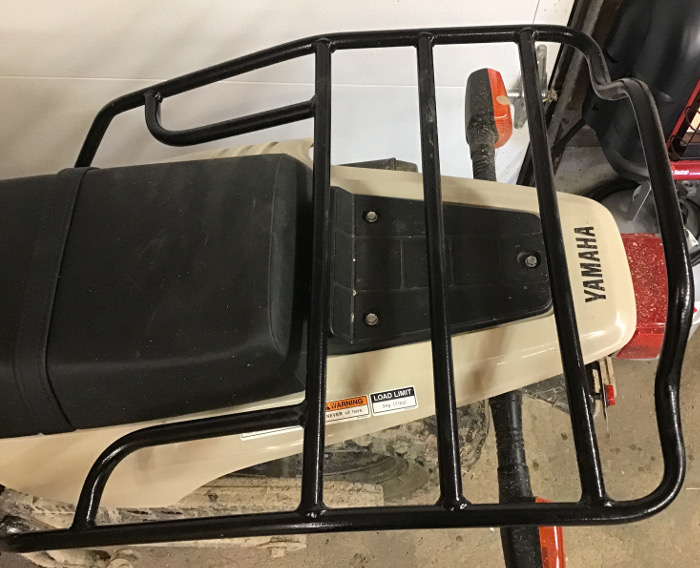
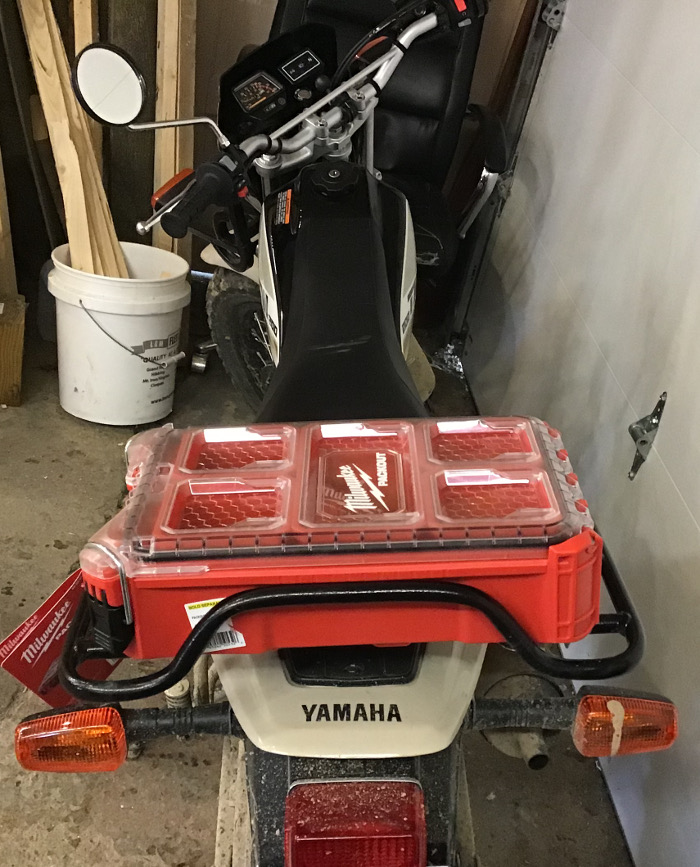
First, take a look at the rear rack I’ve already installed on my Yamaha TW200. The stock bike has no room and a load limit of “more or less nuthin'” so you’ve got to start by mounting a rack. I chose a CycleRack. It’s tough as nails and easy to install. Maybe it’s not the prettiest thing in the world but I’ll choose utility over pretty every damn day.
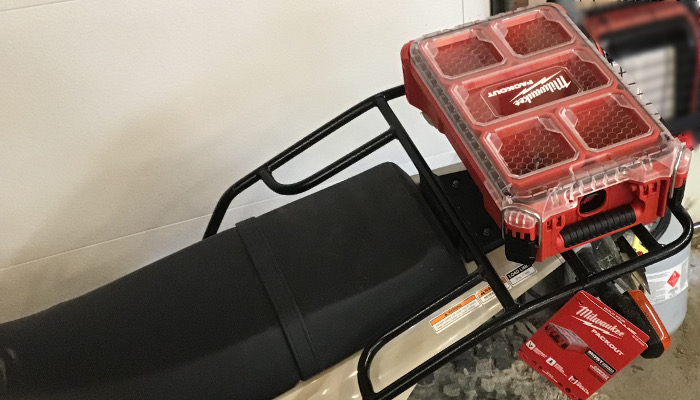
What I mounted to that nice solid base was a Milwaukee Packout. Here it is with the price tag still attached. I was doing a “test fit”. It’s perfect!
Notice how it doesn’t hang out over the edges? Yeah, that’s a feature! If (when!) I smash into a tree there’s about 3/4″ between the rack (which also sticks out a bit and protects some of the bike’s body cladding) and the load. I like that. It also means I’ve got access to the rack for tying stuff down. There are never too many “mount points” for lashing stuff to a motorcycle!
Milwaukee’s Packout ecosystem has about a zillion pieces that interlock like Legos. What you’re looking for is the 1/2 width pieces. That means the pieces which are designed to lock to either the left or right half of a bigger toolbox. The full width stuff is too unwieldy for a motorcycle.
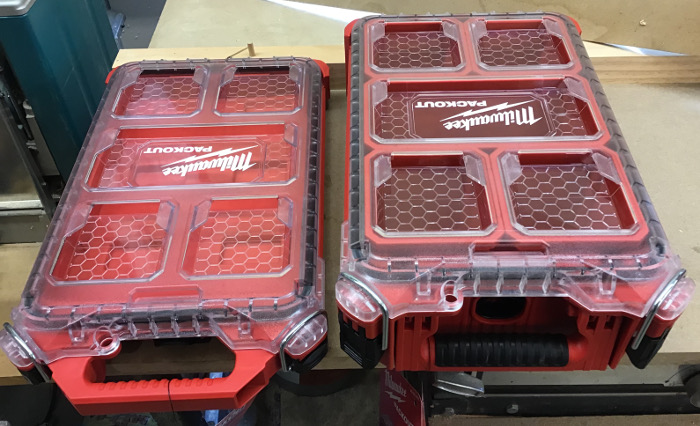
The half width stack starts with either the Regular Milwaukee Packout or the thinner Compact Milwaukee Packout. Aside from thickness, the only difference I’ve found is the handle. The Compact Milwaukee Packout has a fixed handle and the Regular Milwaukee Packout has a folding handle. The two look fine when locked together.
Both lock to each other. Both come with five little cups to organize your shit (which I immediately removed). Both have watertight sealing gaskets and nice hinges and dual points that close it and a place to put a padlock. Neither handle is a problem when mounted to the motorcycle.
Miraculously, the Regular Milwaukee Packout fits exactly around the upraised bar on a CycleRack! It makes centering much easier and it’s a very solid place to mount. I suppose it even protects the Packout in case I back into a tree(!). It fits perfectly!
The bottom of Packouts are uneven. They’re almost exactly like a Lego in how they hook together. This makes drilling holes a bit of a chore. I did my best and it came out like this. In an unrelated note, my 20 year old cheap ass drill press died when I was doing this. All those mouse nests finally ate the thing. I’m in the market for a drill press now.
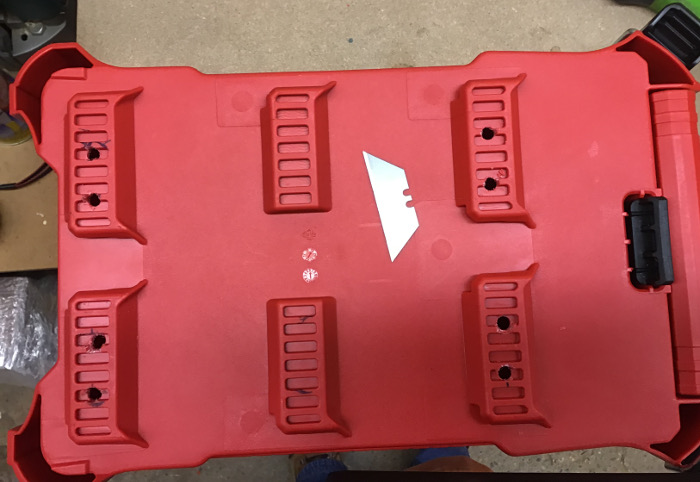
I bought plain u-bolts (stainless steel now that I think about it) for the mounting. They wrap around the CycleRack and stick up through the bottom of the Packout. I used locknuts to keep it there and splurged on a buck’s worth of little white protectors to keep my crap from getting scratched up. I could only fit the rectangular washer thing (what is it called?) on two of four mounts. I was worried about this but it has no impact at all. No cracks or vibration stress at all so far. I’m not sure if four mounts was necessary but I like to be extra careful.

Packouts stack like Legos… but better! Once you’ve drilled and mounted one, you just snap others on top.
The “Legos” can stack as high as you want. They all have the same footprint (which is about 10″ x 16 1/4″… I note the specs on Amazon vary a bit which is weird but the half width Packouts all match their footprint). The difference among the “Legos” is height. The Compact is about 2 1/2″ tall, the Regular is about 4 1/2″ tall, and there’s a Compact Toolbox which is a hefty 16″ tall.
The Compact seems weird but it’s absolutely perfect for an iPad. I have an iPad something or other… the middle sized one I think. With a modest case on it, the iPad fits width wise to absolutely the perfect amount. Not too tight, not shifting back and forth. I add one or two slim packets of baby wipes on top of the iPad and it’s the right thickness; it can’t bounce up / down. (And Baby Wipes are a damn good thing to have on the trail!) I added two Altoids Arctic tins and that locks it in the third direction. Just tight enough that it’s not squeezed but not bouncing around. (Pay attention here: this is Altoids Arctic tins… not regular Altoids tins.) Those things all work together incredibly well. I’ve got it setup so sweet I think I could drop this thing off a cliff and the iPad would be unaffected. Also, in a 2 1/2″ thick waterproof, ruggedized slab you’ve stashed everything to have an iPad (with Avenza for navigation), a clean ass, and fresh breath. That’s some slick packin’!
Aside from the iPad, a compact might be great for a small fishing tackle box. I’ll report back on that in the future. If, for some inexplicable reason you wanted to carry a pistol and had a perverse desire to have it in a box instead of a holster… that’s another good use of the compact. Though that probably only applies to folks in California?
The Regular is my main workhorse. Right now it’s filled with tools and matches and a knife and survival shit. I’ll sort out exactly what I need as I try things out.
The Compact Toolbox is too tall for my purposes. I’ve never seen one in real life. If you had an ATV, I’d say go for it and stack to the moon but for a bike it might be pushing it.
In addition to the “Legos” (which can stack infinitely high), there are pieces that must be “top of the stack”. These lock on top of “Legos” but you can’t stack on top of them.
I chose a Milwaukee Packout 15″ Tool Bag. It’s just about the right size. Ideally you wouldn’t need it at all on short rides but I’m still “getting my feet wet” (literally) and have been carrying a bit more than “minimal” until I get used to what’s needed and not. You access the Tool Bag by opening a zipper. It’s not waterproof but I can say I’ve splashed it plenty with mudpuddles and that hasn’t gotten my stuff wet. It’s fabric instead of hard plastic but it’s plenty reinforced. If you somehow tear it while riding it was probably in an act you won’t survive anyway. It’s that tough.
In the Tool Bag, I’m carrying snacks and an MRE, a water bottle, some maps, an old MSR bottle of spare fuel (I’ll refine fuel carrying in due time), and spare warm clothes. I could fit a lot more but the idea is to strike a balance between “prepared for anything” and “loaded like a minivan”. The Tool Bag has two outside pockets. It’s probably best to keep your water and gas on the outside and away from your clothes anyway.
If you stash stuff in the side pockets, clip it down with a carabiner or it might fly out. (Ask me how I know this.) Since this is “top of the stack” it’s a great place for light but bulky stuff. A sweatshirt or sleeping bag makes sense, but don’t get stupid and carry a bowling ball up there. The shoulder strap is removable (so remove it… now it’s a carabiner’s anchor) and the sewed on handles don’t get in the way while riding. (They might come in handy for strapping things down.) There are outside places to strap other things. A spare hat or whatnot might make sense there. Just keep the weight under control.
There are (as far as I know) three “top of the stack” options; Milwaukee Packout Backpack, Milwaukee Packout Cooler, and Milwaukee Packout 15″ Tool Bag. There may be more but these are what I’ve seen myself. I’d be wary of open topped totes… your fond memories of a milk crate on a bicycle leave out the memory of all that shit flying out of the unsecured top when you ride hard. The cooler is awesome but I seldom carry beer while camping/exploring and prefer to carry stuff like jackets and dry socks.
The backpack might be awesome but it was a little more expensive so I chickened out and didn’t buy it. At the time I wasn’t sure how the Packout system would all work together when bolted to a motorcycle. Now I know it’s damn perfect. The backpack might be very cool if I wanted to step off the bike and go hunting. It’s about the size of a hefty daypack. It’s setup for electrician’s type tools but could be used as a hunting daypack just fine. (If you’re one of those guys who can’t endure hunting gear unless it’s your favorite flavor of camo, this might be an issue for you. I’m ambivalent about camo. I’m wonder how much of camo’s appeal is just for the humans buying it and how much it actually improves your hunting odds.)
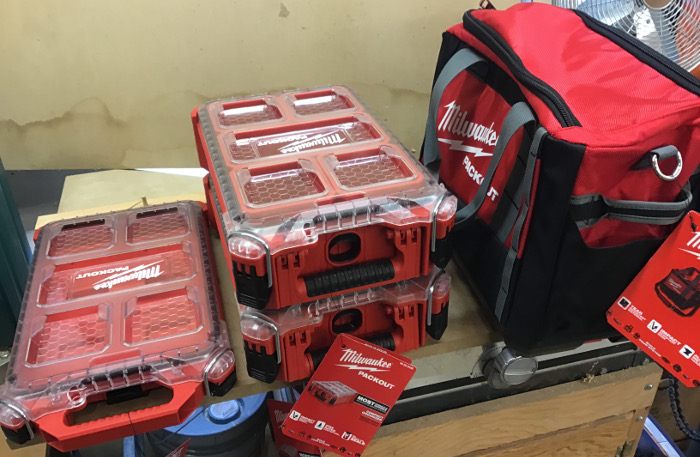
Here’s my total purchase of two Regular Packouts (one is now drilled and bolted to the CycleRack), one Compact Packout. and the “top of the stack” 15″ Tool Bag. I can’t remember exactly what I paid for everything but I think you can have that whole set, and the u-bolts and some Altoids and whatnot, for about $100. Try that with a “made for motorcycles” Givi topcase!
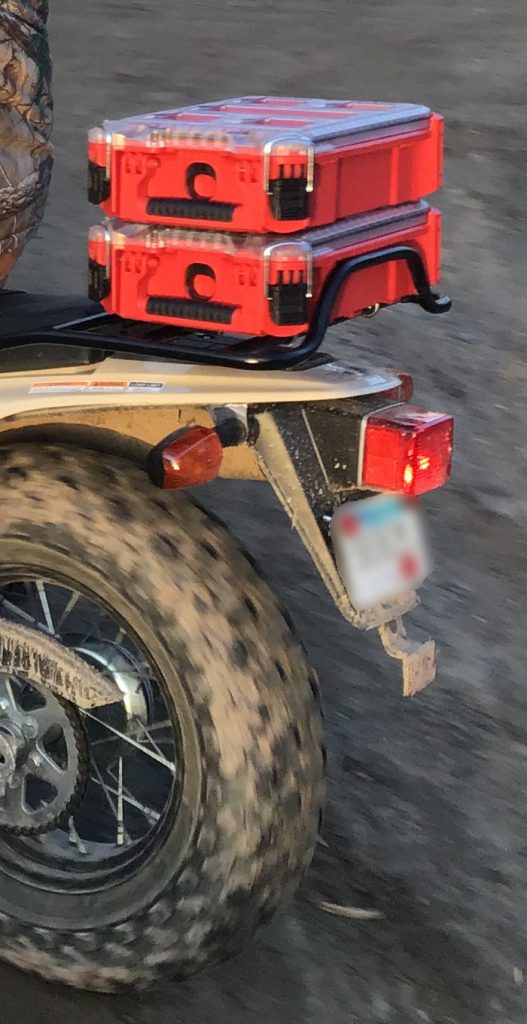
The cool part is you can mix and match as you see fit. Here’s an in-motion test from an early ride with two regulars. I think I’ve already posted photos of a huge deer blind strapped on top of the one permanent regular? Get creative y’all!
So far I’ve mostly been using the permanent regular, the slim for my iPad, and the tool tote for food and an MRE. (Leaving the other regular home.) I can say that the three piece ensemble has ridden about 100 miles (about 50% off road) like it wasn’t even there.
Well that’s my big win of my motorcycle outfitting. The important part is that it’s summer! Get out there and play!
Regarding the backpack and camo, for over a hundred years the standard hunting shirt up north was a black and red flannel shirt or jacket. Since deer don’t really see color, anything that breaks up the outline will work. May want to take a black or red sharpie to the lettering if you want to use it for hunting. Though $130 for a backpack does seem a tad steep.
Getting a small waterproof cover (either just a tarp or have a custom one sewn out of waterproof canvas) and using a bungee cargo net over the whole thing (neat if you find one in black and red) would tie everything together, waterproof the tool tote, and give you more ability to carry water or cargo you don’t need to put in the tote.
Looks cool. Beats a .50 Cal Ammo can or two. Though a .30 or .50 on the front might be a doable thing.
Might want to get one of those bullet-proof back packs if hive hunters frequent your neck of the woods. And ain’t no way a bear can properly ride on that rear rack. You’ve got the squirrels riding on the front. Where is the bear gonna sit, bro???
No smelly racist bears on my bike. It’s bad enough he was allowed in a fictional Subaru.
So is your bike FASTER than a bear? Because if you can’t outrun him…
A TW200 isn’t faster than anything. 🙂
One issue ‘mudge…. You just broke OPSEC in a pretty significant way!!!
If I see a burly Beardman tearin’ through the woods with Milwaukee Packouts on the Cycleracks.com mount you linked to (along with some other breadcrumbs you have left), Ima know it is YOU and have to request a selfie. There can’t be THAT many Up-Towards-the-North TW200s out there Redneck Engineered® (that IS an ISO certified position) in THAT particular way.
Have a great day.
My dog would’ve been pissed! But it is what it is. If ya’ recognize me through the bike and have beer to share greet me and I’ll maybe say “hi”… or I might tear ass off through the woods like a spooked elk; hard to say.
I run the risk of either being cursed at or praised for this, but this guy’s set up a little Honda 110 trailbike for adventures.
https://www.youtube.com/watch?v=A4JM7J08698&list=PL-G1JF8IdUxRKDE-52oKHYa0VHq7a9oB6&index=33
Thought there might be some ideas in there for you.
That’s some good info. I like the little Honda 110 too.
Great idea, AC. What keeps ’em from flying apart? Lids are locked down, but how do they lock together? Thinking front rack of the ATV. My compound’s trails are pretty rough….hell, our HIGHWAYS are rough…and I’d hate to get smacked in the teeth by gear getting launched.
The tool boxes lock to each other. It’s hard to describe but if you see any video of Milwaukee Packout in action it becomes clear.