I composed my previous post and sent it directly from this location. I doubted it’d work. Color me surprised. It’s proof of concept at least. It’s weird at that spot, sometimes cell is completely dead, other times it’s merely anemic.
The forecast was rain so I packed up while my tent and stuff was still dry. Then I hung around as long as I could. I enjoyed soaking up the autumn weather and smells.
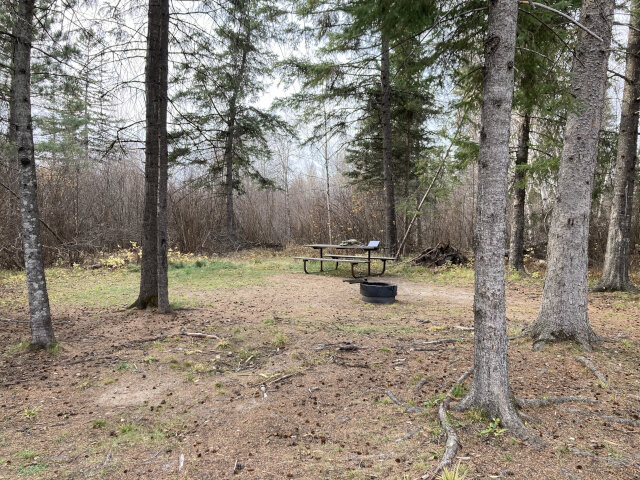
About 15 minutes after I took this photo, the rain came. I hopped in my truck and rolled out. The ensuing rainstorm was pretty severe.
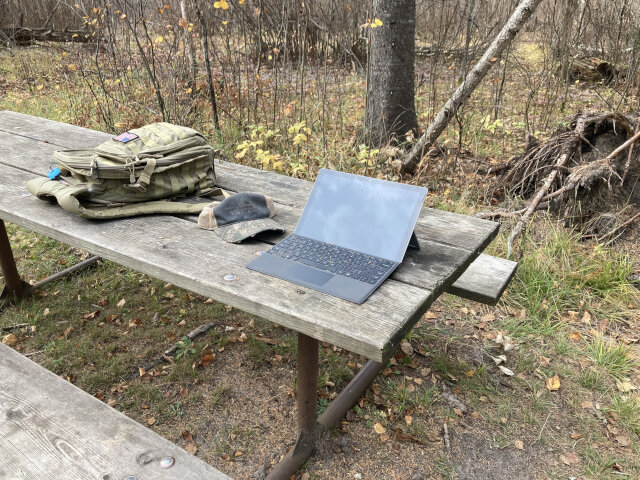
I’m typing this from a Linuxed obsolete Microsoft surface, perched on a crappy old picnic table. There is cell service here, sorta… I borrowed a wifi hotspot from the library. Can I post live from here?
Who knows?
What was the point? Oh yes. I went camping with Jilted Girlfriend. Several days later did it again (with my truck). I’ve been having a ball. Stuff I meant to blog is all mixed up in two trips. That’s OK; chronological order is boring.
—
I’d like to talk about my “hat gambit”.
Just two years ago I was in the Bighorn Mountains of Wyoming. I’d finished a motorcycle “adventure”. OK it wasn’t a big budget African safari, but I’d had fun. I did it all by myself. Self guided adventure, in America’s outback, using my cheap little dirt bike. You can have a hell of an adventure, even on a smallish budget, if you’re motivated and/or crazy. It made me happy.
At an outfitter place where I’d stashed my truck, I was loading my bike on its trailer for the trip home. I was practically glowing with joy. There can be no finer nectar than the sweet taste of conjuring a challenge and then succeeding; so satisfying!
Mrs. Curmudgeon sent me a text. (Cell was spotty there too. She’d sent it hours ago. But fortunately it came in before I left.) “You should buy a hat & shirt. You earned it.”
Tourists do this thing where they’ll go to Paris or Peru and buy stuff that says “I went to Paris or Peru.” I don’t think like that. If it was awesome, won’t you remember? But Mrs. Curmudgeon is wise and I might never be back. So I bought a hat from Bear Lodge Resort to remember the moment.
Life ensued. Half a year later, I was sicker than a dog with an ailment doctors hadn’t figured out. I’d show up at medical places in absolute misery; “I’m fucked up. Do something!” The doc (or nurse practitioner or specialist or whomever was manning the place) was never concerned. If they don’t see blood, they don’t give a shit. I walked into the medical place under my own power. That’s what they saw. Dude can walk, he can’t be that rough.
I felt like a drowning man but was ambulant and not missing parts. It made me invisible. They’d do whatever expensive test they felt like billing; often with no clear explanation of what they were looking for. When a test came back “the thing we measured is within specs” they’d shove me out the door. I got several expensive “not half bad” reports from various technologies. It’s not bad news but didn’t address my ill health.
The thing was, they were using a baseline that wasn’t for me. I’m not particularly young looking. They knew my age from the charts but acted like I was 80. I walked from the car; at great difficulty. I was dressed and showered, which had wore me out. Standing and dressed, that’s all they figured I should be able to do. An unavoidable bias, they usually deal with people far more messed up than I.
I tried to tell them; “I ought to be capable of more than walking to your door. I was doing much better very recently.” I was persistent. I wasn’t going to waste away so a doctor could avoid confusing diagnostics. How many people die because they’re unwilling to make a stink?
It happened many times. Anything short of passed out on the floor was “fine”. If I died somewhere beyond the parking lot, it wasn’t their problem. They combined this with delay; ideally forever. “That test might help. I’ll schedule you for six weeks from next Tuesday. Hopefully by then you’ll be dead and leave me alone. Whoops, did I say that last part aloud?”
I decided to be an asshole about it. Do meek people just fade out? They don’t want to be a spectacle. Do they die because nobody was paying attention? I inverted that. I had a rant I mentally called the “Hat Gambit”. I’d take off my hat, purchased high in the mountains of Wyoming, and start waving it around. Then, I’d tear into everyone in sight.
“See this hat?” I’d wave it like it a baseball bat in a street fight. “I bought this hat at 9,000’ elevation. I’d been riding a dirt bike thought the Bighorn Mountains. I was sleeping in a tent. IN A FUCKING TENT ON A MOUNTAIN!” Usually this brought a few more nurses or whatever, eager to see the bearded freak losing his shit.
“You!” I’d point to anyone at random. “Have you ever slept in a tent above the treeline? Can you operate a motorcycle on difficult trails? Are you capable of doing what I did half a year ago?”
Lets face it, most Americans, and especially people in medical facilities, are not rugged outdoor adventurers. There’s a lot of flab out there; mental and physical. The angry old bearded guy claimed he can and should do more than they’d done… not a happy comparison.
“I’m sick of twits acting like I’m 80 years old and never ate a vegetable. Some of your patients can barely limp down the aisle at Walmart. I get that. Life isn’t fair, we all get old, etc. But my decline was sudden. It’s unexplained. Compare my condition now to my condition then. I don’t give a shit about the ‘average’ baseline.”
This would percolate through brains… slowly. But it did happen. For some reason the hat mattered. I went from “guy making up bullshit stories” to “that nutball recently slept in a tent at the treeline?”
“I was on a dirtbike for a week.” I’d rant” “Now I can barely brush my teeth.” I’d hurl the final challenge like a man grasping for a life preserver. “SOMETHING HAS HAPPENED. Figure it out!”
After that, I’d settle right back down. Nobody likes being petulant. I’d acted rudely and I’d done so on purpose. It wasn’t fun. I know there are patients with gunshots and cancer, but even if my suffering wasn’t on that level, I needed care too. If I had to be a dick about it, I’ll answer to God when the time comes.
It did work, though slowly. Doctors did give my chart a second look. Tests scheduled months in the future were rescheduled (at my insistence) within the week. (Usually hundreds of miles away, which was fine with me. I had a truck and could still drive.) How many people die because the medical care in their local area sucks and they just put up with substandard care? How many more would live if they dropped everything and attended to their health. Nobody want to schlep your ass to a different time zone, for expensive unpleasant treatment. Plus there’s the hotel and that ain’t cheap. But isn’t health worth it?
—
Anyway, that was then and this is now. I woke up in a tent in the middle of nowhere. I was happy as a clam.
I’d brought my bike (Honey Badger) using a trailer on my backup car (Jilted Girlfriend). I strapped the bike with emergency gear (beef sticks, water, matches) and my little shotgun (small game season!). Then I rolled out.
I had no goal. Only to be. And it was grand!
A half hour from camp I realized I’d forgotten my hat. (I wear a helmet but often stop to hike. I wear a baseball hat for walking.) By then I’d taken three random turns on unnamed trails. I wasn’t sure where I was and didn’t feel like returning. So I didn’t.
The hat remained ignored and unnecessary. I’m healthy now (actually still recovering but so much better I’m almost giddy). It’s hard to gauge how bad I was. It can’t wrap my mind around it. When you’re fucked your forget how good life can feel. I don’t regret going ape on doctors. They need to remember patients are individuals.
It’s progress and I savor it. I did a lot of cool shit last year but some of it is fuzzy, especially early. I barely managed a few nights “camping” in my yard. This year, as the fall leaves blew in the wind, I was doing the same thing I did two years ago. I didn’t cross Wyoming on the BDR, but I was in the saddle again; and in tents. I was taking random trails. I was wandering the middle of nowhere. I was alone, unsupported, and doing my thing.
My tourist hat is no longer a talisman. Now it’s just a fuckin’ hat.
I laughed in my helmet. I kept laughing. Louder and louder. Why not? I can laugh all day if I want. And I almost did.
We live cycles. But cycles change. Ideally things get better. Or maybe we get better.
It took me several tries to get this post typed out. Not because it’s deep or important, but because I’ve been harried. After too many interruptions, I can barely think.
Plus, I’m drunk right now. (It’s definitely not streamlining the writing process.) Luckily, it’s temporary. (Both the interruptions and the whiskey.)
I know the interruptions are temporary because things that require my attention are being handled. It’s working out as well as I could hope. So that’s all good, if left undefined for blogging purposes. Given the positive results, I shouldn’t complain. And I won’t.
Nah, I must complain a little. It’s hindering my Curmudgeoning. I’m still new at being retired and my health incrementally returns (after some drama last year). I want to be actively Curmudgeoning. It’s precisely the whole point. Alas, the modern world can’t abide a man at peace. The “real world” intrudes and I find myself filling out forms in triplicate.
Simultaneously, I’ve been thinking about the circular nature of life. I’d like to come to some sort of revelation. I haven’t. I blame my density on the lack of Curmudgeoning. Right now I feel as hapless and unrooted as the rest of society. I don’t like that.
Alright, lets get this train back on the rails…
Think back to when you were a child. You (or I) were dragged out of bed and sentenced to school. I always thought “when I’m big I won’t put up with this shit“. That’s exactly how life doesn’t happen. Your work life involves years and years of “putting up with this shit“.
But, I’m now retired. It occurred to me I am big now. Therefore, why am I putting up with anything?
Why indeed?
So, I exercised my geezer privledge. I cleared my schedule using the non-excuse blunt truth of “I’m busy that day… and a couple days after”.
I didn’t say what I had to do. Only that I had to go do something. What I’m really doing is going camping again. They would call it frivolous but I don’t. Nor does Mrs. Curmudgeon, who is wildly supportive. (Ladies, you want to keep your man head over heels in love? Once in a while tell him he really ought to go fishing and shove him out the door. He needs it and will appreciate it.)
I barely unpacked from my last trip. And my cot needs to be repaired. And I never got around to posting some of the photos.
But who cares? I’ve been tasked with stuff. I reluctantly did a measure of stuff. I don’t want to do any more stuff. I decided to go camping, in mid-week, for the quaint and often ignored reason that I wish to. I picture my young childish self nodding in pleasure. “I’m big now and you can’t make me go to school.”
There’s further good news. My truck has brakes now. No more Jilted Girlfriend.
Which returns me to the idea of cycles. I started life limping half dead cars to whatever forest or mountain I could manage. A few weeks ago I limped a half dead car, but had a spare motorcycle strapped on back. This time I’m in a bitchin’ strong truck AND still have the motorcycle. I’m still broke but I have a lot of infrastructure going for me. Being broke is much better when you have a reliable vehicle!
Tune into any video that uses the word “overlanding”. They’ll tell you a man needs a wad of cash to hang out in nature. That’s false and disheartening. Don’t let them dissuade you. You only need a vehicle that’s “adequate” and some gear that’s “good enough”. You don’t need anything more than “enough”. I got that, so I get to do the thing. Yay me!
To save money I used to “free camp”. After last year and some CPAP drama I’m lingering near a campground. In this season it’s pretty damn quiet at least. My young adult self would sneer. My current self hates dropping the cash but campgrounds reduce uncertainty. I can handle the small expense. Experiments with a power plug were dramatic two out of two times so I’m going back to the lowest level (cheapest!) tent sites. I’m bringing my battery AND my generator. Solar panels would be great but I don’t have them and I don’t want to spend the money. Lucky for me, a pint of gas will charge the shit out of the battery.
To save money I’m also skimping on Mountain House dehydrated meals. They’re well worth it if you’re doing serious outdoorsmanship. But I’m in a cycle of low money. I prowled the Dollar Store for cheap dehydrated hashbrowns. I 3d printed bizarre single egg containers. I also thawed some ground meat; because I had meat in the freezer. All that should make the trip’s food cheap. Probably, it’ll be healthier too.
I decided to spend some of my limited funds on beer. So I guess some things stay the same in all cycles. I figure the cost of a six pack, some truck fuel, and the campsite itself is a pittance compared to modern life. I can do it cheaper but it’s ok to be a little lazy.
An after action report will ensue.
A.C.
P.S. Good grief! Writing while drunk was an experiment. It did not work out. I know what I was trying to say but I sound like some barfly on a stool explaining string theory after a dozen Lite beers. I’m posting anyway. It won’t kill the ‘net.
Based on the title you’re expecting interpersonal drama. Nope! It’s about a rusty old car.
Before society took a dump (aka Covididiocy), I bought a Yamaha TW200 dirt bike. When I say “before” I mean literally days before the crash. I knew there was something odd brewing in China. I knew people might react stupidly. But wow! Humanity ignored my already low expectations and dove beneath the bar! Planetary mass hysteria? Really!?
I’m very lucky I got the motorcycle in time. I used it to stay sane. HOA Karens cowered behind crochet knit masks. Governors made rules about hair salons. Fauchi scampered about like the creepy little gremlin he is. I avoided much of the bullshit simply by enjoying the forest.
Does proper mental care mean a dirtbike and a fishing pole? I dunno’. What’s the batting average for therapists?
Me and that little bike explored forest roads like carefree children. I had a cheap bike and endless trails, heaven is where you find it.
Eventually society came up for air. I had a meeting in South Dakota. The Black Hills has great trails! Diesel was expensive so I opted to take Mrs. Curmudgeon’s fuel efficient daily driver, a Honda CRV. (Remember when expensive fuel was an inexplicable mystery? It seems like pricey gas is no big deal when one party is in power and a sinister plot when the other is in power. Unless you’ve got the memory of a goldfish you should remember the ebb and flow.)
I checked all the specs from Honda. I bought a small trailer to haul my small bike. It’s well within the car’s GVWR. Despite whining about the cost of the ball hitch install I was impressed. It was scaled perfectly!
But it sucked. Regardless of what the technical specs said, the little CRV just didn’t have the grunt. It got me there, but it wasn’t happy about it. The car was already old. Maybe it’s got half the horsepower it started with?
The next time I trailered the tiny bike with my behemoth truck. It looked stupid and out of scale, but the truck didn’t break a sweat. There’s no replacement for displacement.
Mrs. Curmudgeon’s car, which was never intended to be a bike hauler anyway, got older and more worn. There were breakdowns. Tow trucks were summoned. Expensive parts were replaced. One time, it spent six weeks in a stealership’s repair lot. (Someone stole random shit from the back seat. Covid isn’t the only sign of a suffering society.) It has rust. It has rattles. Sometimes the drivetrain shimmies. It burns oil; more than you can ignore. Sometimes the check engine light is on, sometimes it’s off.
Don’t spam me with comments about what I ought to fix. The car is shot. Expensive rescue efforts would be unwise. It’s at the end of its lifespan. Also we got a quarter million miles out of it. No regrets, it was a good car. I’ve been predicting its imminent death for a while now.
I humbly think new cars are overregulated shit. But Mrs. Curmudgeon needed something reliable. She chose from among the shit that’s for sale. It’s a pretty nice ride. I doubt it’ll run 250,000+ miles like it’s predecessor but I could be wrong. (Wouldn’t that be awesome!)
I never “trade in” my cars. If it’s a good car I’ll sell it for cash. If it’s a rustbucket nobody would buy, I keep it as a “backup”. I’ll run it until it collapses. Why not? Anything that gets you down the road is worth keeping.
Repeat the survivalist mantra “two is one and one is none”. The old car is now a “spare”.
Mrs. Curmudgeon and I talked it over. “The old car is still valuable.” I said. “Drive it when it’s icy so you won’t risk damaging the expensive new car.” Mrs. Curmudgeon agreed. “We should run it once a week, just to keep the battery charged and so forth.”
Mrs. Curmudgeon was in complete agreement. “It’s been a good car and I still love it.”
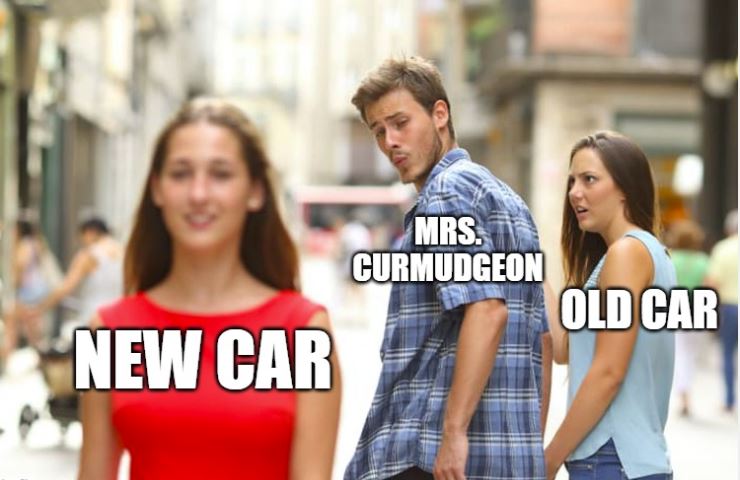
Nope! As soon as a new car was in the driveway, Mrs. Curmudgeon forgot the old one existed.
I can’t really blame her. New cars are fun!
Joking about complete rejection I named the old car “Jilted Girlfriend” and took it upon myself to keep her alive. I drive it once a week. I have to admit, it’s pretty shot. It’s low on power and sounds like it’s going to implode. It sucks having to check the oil every time I start it. I avoid taking it further than the grocery store.
Recently, I planned to trailer my dirtbike for an autumn camping trip. My truck would be the tow vehicle. My last good adventure was in Wyoming, before I got sick; just shy of 2 years ago. This was my one shot in 2026. It’ll be winter soon.
I “serviced” the bike. Mostly washing off Wyoming mud, doing an oil change, and tensioning the stretched chain. It’s an obsolete machine (which I love). It has a lot less shit to break. I’ll never have to flash firmware on the carbureted dinosaur. The motorcycle trailer, unused since I returned from Wyoming, had lost one marker light. That’s not too bad given I hadn’t used it in two years.
A week before I meant to head out, the truck’s brakes flaked. They’re fixable but sketchy. I elected to cancel the trip. Bummer.
Then something else happened. Mrs. Curmudgeon got a horrible toothache. This worried me very much. It sucked. It was dramatic and stressful and sad. Nobody wants their wife suffering! Alas, I cannot fix teeth. I did what I could with soup and tea and trying to be nice but it pales in comparison to tooth pain. (It would’ve been a good time to have a fluffy cat around. The cat’s dead. That didn’t help things.)
It’s possible to care deeply and also think it’s a good idea to bug out. The trip was back on!
Since the truck can’t stop properly… I chose Jilted Girlfriend. She would save me!
Mrs. Curmudgeon, who is a peach, encouraged me to go. She handed me the 5 quart jug of oil that goes with Jilted Girlfriend and practically pushed me out the door. She was on a steady diet of painkillers and misery. There would be no joy that weekend. I might as well be somewhere else. She promised me she wouldn’t be mad and indeed, she wasn’t. My wife is awesome!
I drove Jilted Girlfriend gently, like a grenade with the pin pulled. I drove well below the speed limit to keep whatever was making the drivetrain shimmy to a minimum. I avoided hills. I stayed on flat boring paved secondary roads with no traffic. I checked the oil a lot. One time it wouldn’t turn over but on the second try it fired up. (Probably just a loose battery cable.)
Here’s the funny part, I had an entire motorcycle with me. Talk about a good backup plan!
I’m returning to my roots. I started life limping around in completely shot vehicles. Now I’m limping around in a completely shot vehicle.
Life goes in circles, but it also gets better. Years ago a breakdown was a fiscal death sentence. Now it’s a “spare car”. If it dies I’ll have it towed to a junkyard and that’s all. Back then I’d have to hike out of the woods if a car died. Now I have a motorcycle.
A.C.
P.S. I returned from camping and I drove Mrs. Curmudgeon to her long anticipated dentist appointment. We drove in the new car, with heated seats and everything. The dentist did whatever voodoo they do and it worked. Mrs. Curmudgeon is once again her regular cheerful self. I’m glad she’s back!
I still suck as a publishing agent. That’s your update. I’m flat out terrible at it. The book is still a draft. I still want to publish it. But I’m still naught but an “aspiring” author. How embarrassing!
Regardless, don’t give up on me. I’m diligently moving forward. I’m making actual progress. It’s just slow. Maybe I had unrealistic expectations about timing? Even if I’m moving like a sloth climbing Everest I’ll get there.
If you’re interested in “inside baseball” here’s what’s happening.
Since the last post I’ve created a marketing site (you can’t see it yet, it’s not ready for “primetime”). I also created a business bank account. They need each other like peanut butter needs jelly. I inadvertently let it turn into a chicken and egg thing.
But, I finally sorted it. I could never get the WooCommerce plugin to WordPress running here. In the other environment, it does work. I have a web shopping cart; finally!
I’m never sure what works and what doesn’t on my computers. I keep “looking at” a site and it finds cookies from somewhere and says “Hi boss, would you like to see the backend and have no idea what the customer sees”? I’m sure an IT pro would handle this well, but I don’t.
Don’t let AI blackpillers get to you, a great deal of the internet is cluelessly, densely, illogically, stupid. Skynet ain’t here yet.
I thought I might have to “air gap” a computer just for testing? Instead my wife bravely “volunteered” to be a crash test dummy. She used her hardware, went to the page, clicked on a link, made a “test purchase” through the “shopping cart”, fed it credit card info, and we prayed it wasn’t all going to explode.
To my delight, I got an e-mail. “Some customer named Mrs. Curmudgeon has ordered a thing. Ship to the (fake) address Mrs. Curmudgeon typed in. DO IT NOW!”
The bank transaction also worked. I’d just about given up hope I’d ever configure that properly. I almost died with joy when it functioned.
2026 is weird. We wound up taking ten bucks out of one bank (the “cost” of Mrs. Curmudgeon’s fake order) and being delighted (almost shocked) when it arrived (less fees) in another bank (A.C.’s business account). Of course, there were banking fees, because there are always fees. But at least it worked.
That it works is the good news. The bad news is it’s still ugly. It’s tied up in some sort of AI interface that is clearly designed by cyborg crackheads. I can’t figure out how to modify it effectively and the whole thing looks like ass. Actually, it’s not unbearably ugly, it’s just out of my control. It also looks exactly like every other e-commerce site out there. Have you ever wondered why everything looks like it’s selling yoga classes or scented soap? It’s because that’s what the AI / interface thing assumes.
All those online stores. Do they know an easier way? Am I missing something? This is what it’s like dealing with my e-commerce / WordPress / WooCommerce / AI / voodoo interface:
My next planned step was to put my sawhorse rigs and jigs up, just to have something live and know it’s working. I haven’t gotten it to fly yet. You can’t imagine how hard the interface is making it.
For one thing, I can’t figure out how to add shipping. Why is shipping hard? It would seem like shipping is a basic necessary step to selling any physical object on planet earth. But what do I know?
A whole different part of the process is the infrastructure behind e-book. I setup an Amazon KDP account. Amazon went berserk trying to get its fangs in our household Prime site. I was like “woah there, this is an author thing”. It was “All hail Prime. Bow before your Master!”
I tried reasoning and begging and clicking lots of buttons. Eventually I sorted it out. All it took was many additional passwords and logins and two party authorizations and ID checks and probably there are some things I still haven’t set correctly. Just when I’d decided to give up and live in a tree stump as a hermit, it figured out what I wanted. “Hi, I’m Clippy, would you like me to ask you tax questions until you jump off a cliff?”
It wasn’t really Clippy. It was worse.
That said, I think I got it figured out, unless I didn’t.
Beyond all this, there’s the ISBN. Amazon will provide an ISBN but then it’s Amazon’s. The POD (print on demand) people are similar but then it’s theirs.
I want my own. This either wisdom or me being paranoid. (¿Por qué no los dos?) This is a one time expense. As far as I know, once an ISBN is tied to a book it’s tied to it forever.
ISBN’s aren’t free but they’re not insanely expensive. But I’m afraid I’ll “buy it”, click some form wrong, and then it’ll be forever tied to a grocery list or something. Also, I ran out of scratch. This month has included a lot of bills; dentistry, a tragic veterinarian expense, and brakes for my truck. (I’m prefer trucks that stop when you press the pedal.) So there will be a brief pause while I “save up”.
I hope you enjoyed a glimpse of the bizarre interlocking circular firing squad of digital entities that must be configured before a single book is sold. Don’t give up on me. I’ll Don Quixote my way through this thing yet.
It will be on dead tree. It will be on e-book. (Assuming Amazon doesn’t freak out on me.)
It will happen. Just slowly.
Thanks for your patience.
A.C.
P.S. In retrospect, if I ever do something like this again, I might buy an entire new cell phone with it’s own phone number. Everything wants to run via cell phone. Everything interlocks with everything else so my pre-existing blog keeps turning into a complication. Since a phone turns into your identity, would a separate phone help? I’ve never heard of anyone doing it that way but a true IT person probably knows things that I just don’t. It’s a theory at least.
I don’t spend all my time 3d printing. Sometimes I actually go camping!
After a rough start the night before the weather turned sunny. I had a wonderful breakfast.
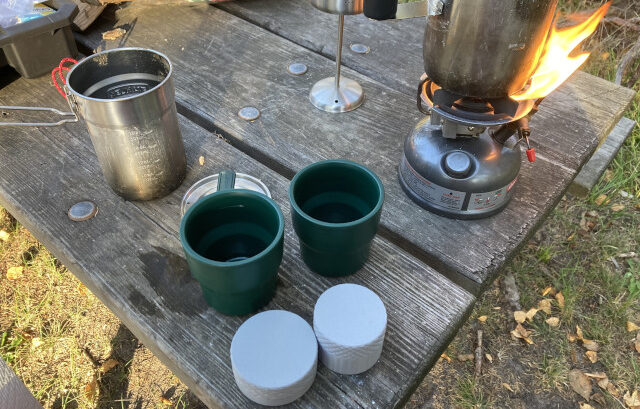
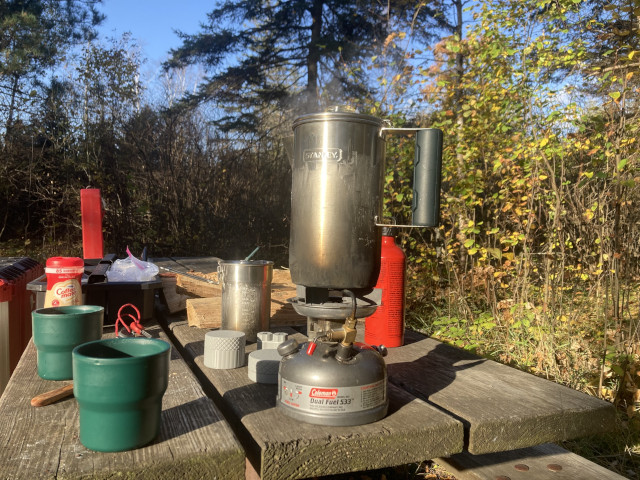
My Stanley pot (on the right) has two nesting cups (in the center). Within the nested cups I have two 3d printed containers (center bottom). This time I tested their capacity for holding coffee grounds. The larger of the two has just the right volume for a percolated pot of perfect strength. The smaller is a wee bit light; still tasty but not perfect. Windy conditions made my Coleman burner flame up. The outside of my camp pots are coated with soap to make washing them easier.
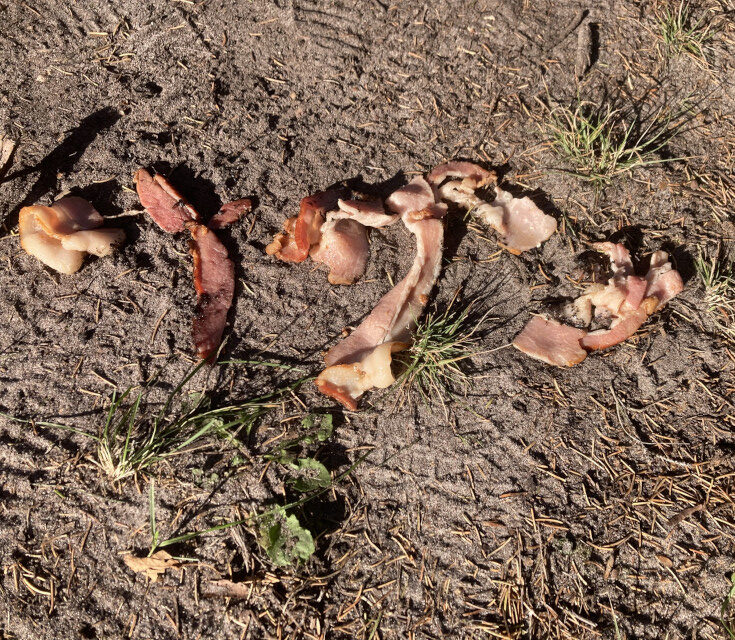
In a tragic disaster, I flipped my frying pan and dumped bacon on the dirt. Tragedy! I thought long and hard about how to save the bacon… but dirt won. Luckily I had plenty of bacon to make a recovery batch.
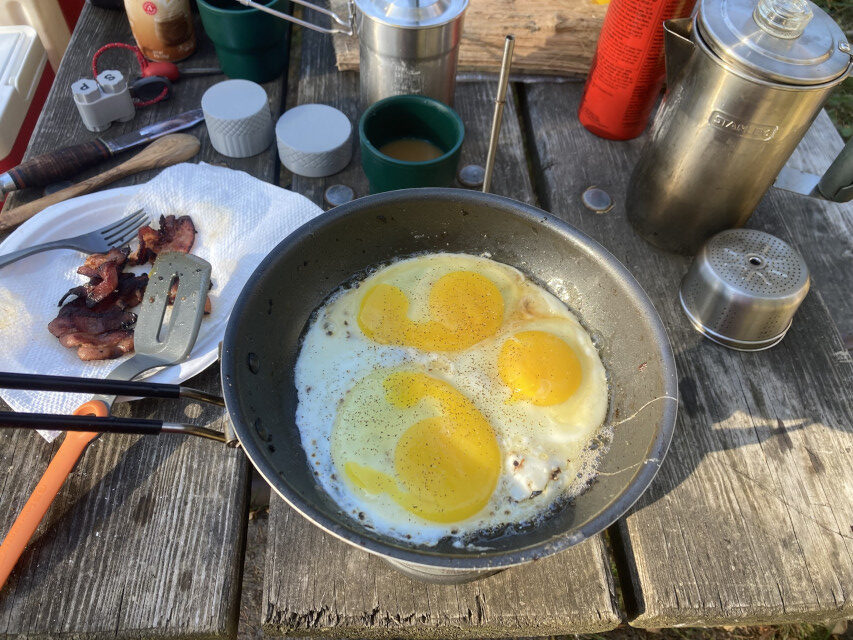
When I don’t have toast I break the yolks and make “over hard” eggs. Also note the sweet little salt and pepper shaker I 3d printed (upper left). It’s tiny and works great.
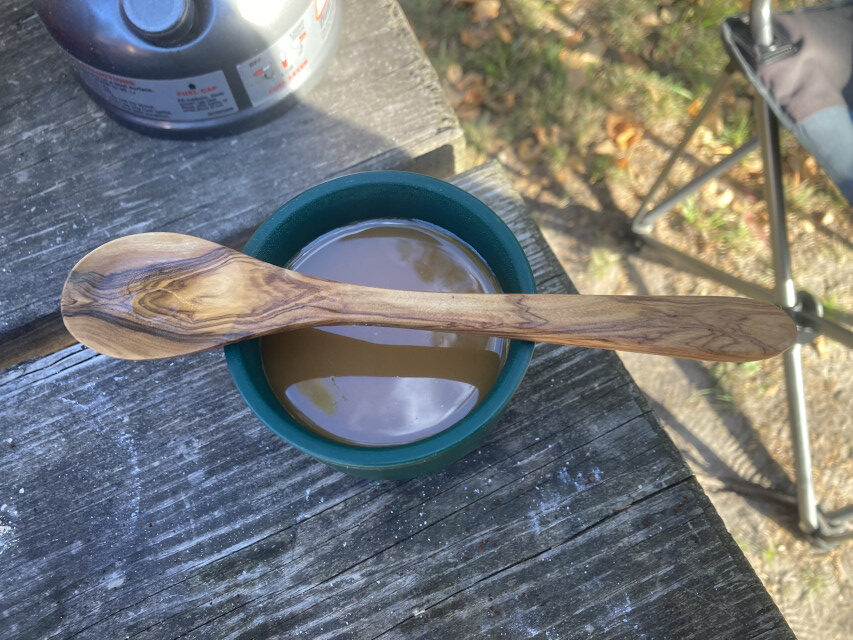
My wife got me a carved wood spoon. For the longest time I thought it was frivolous, but I’ve since realized it’s perfect. It never gets hot like metal or melts like plastic. For car camping it’s just perfect.
There can be nothing happier than bacon and eggs with all the coffee a man could want. Heaven doesn’t have to be expensive.
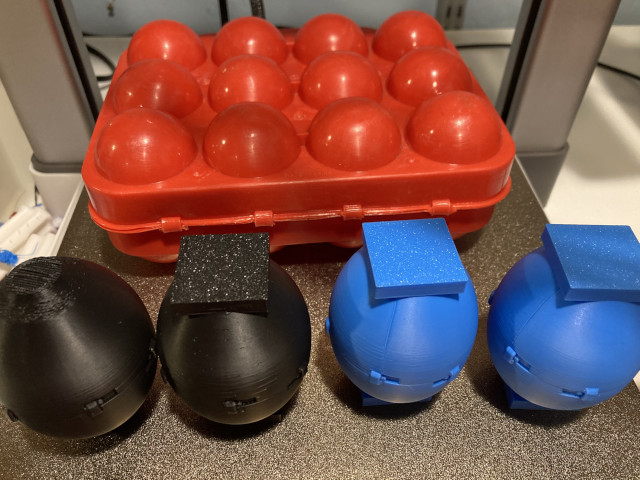
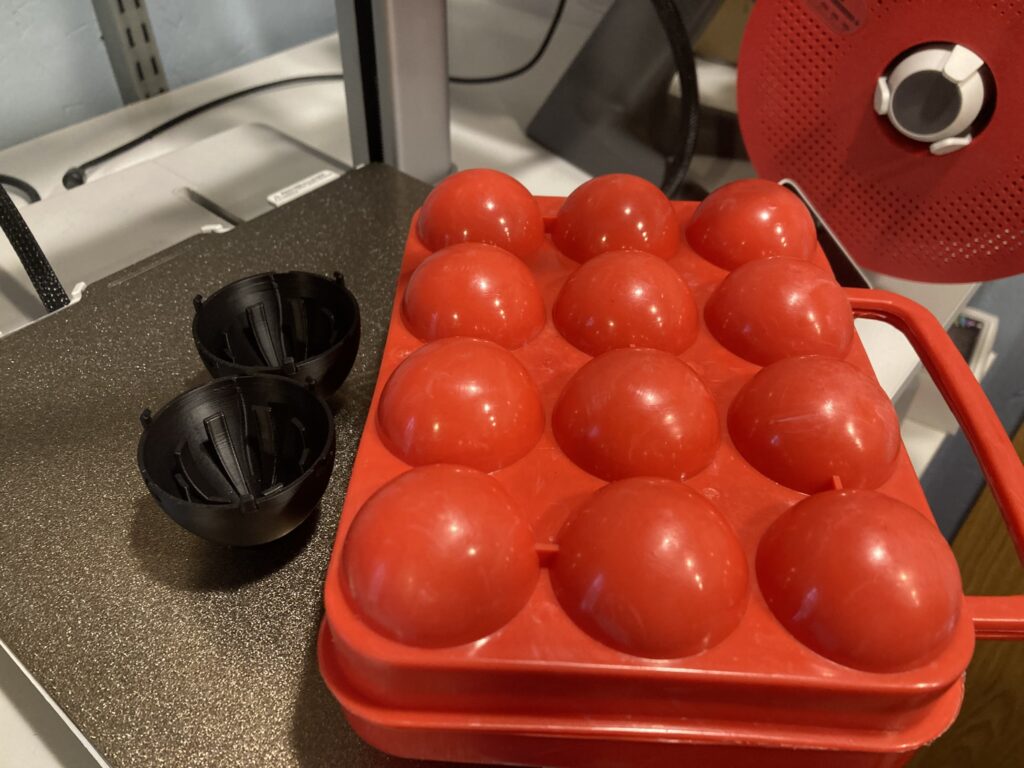
Back at home I made four little single egg carriers to replace the dozen egg carrier that’s just too damn big for one guy. Original is on the left, subsequent tweaks by your’s truly as you proceed to the right. The little egg crates look goofy but I suspect they’ll serve my purposes well. I think I can just toss four eggs at random into a cooler and they’ll take less space. They’ll fight for space amid the ice and beer and find their own most efficient place to be. If it fails and an egg breaks I’ll try something else, but so far I think I could put an egg in one of those cases and hurl it off a cliff and the egg would be fine.
This is the story of the most “first world problem” of any possible problems. I couldn’t find my 6 count egg carrier to go camping. I know… it’s a big deal right?
Later on, as I was driving down the road I started to wonder… did I ever own a 6 count carrier? It’s not something I fret over. Maybe I’m misremembering.
Anyway, the only egg carrier I could find carries a dozen; absurd for a solo guy like me. I only wanted 4 eggs, I carried 6 because the damn thing looked too empty. My small cooler couldn’t hold the carrier so I stuffed it in a Milwaukee Packout with my stinky muddy motorcycle boots.
In case you’re wondering… breakfast was fine. Stinky motorcycle boots won’t mess up your breakfast if it’s chilly out and it’s a short trip.
However, I should do better. Am I not an Adaptive Curmudgeon?
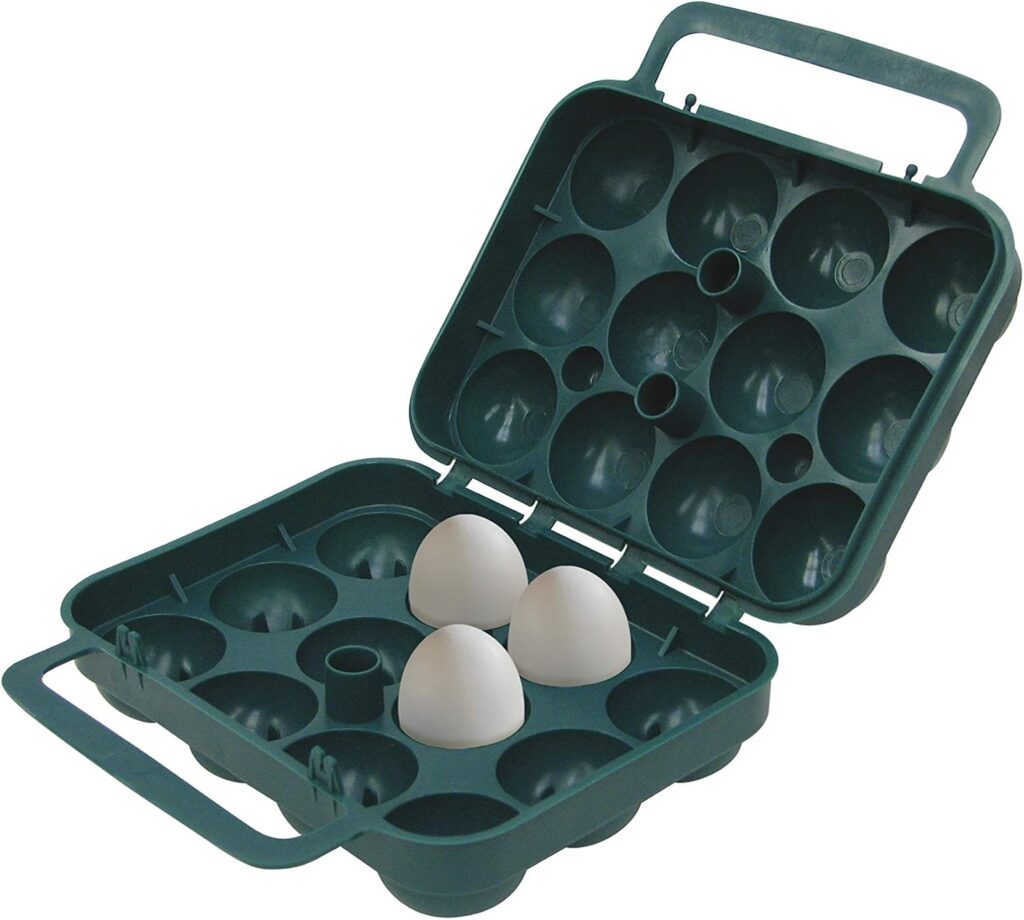
Here’s what I started with. (Link to Amazon. The one I own is a million years old but they’re all the same.)
I needed something strong so I could toss it in a cooler with ice and beer and stuff. It should roll around like it was in armor. I spent forever trying to decide if I wanted 2 eggs or 4 or what.
Finally I remembered I live in the future. I’m a big bad 3d printing nerd! I can have whatever the hell I want. The most flexible arrangement was 1 egg per “case” and multiples of the single case.
I found a model on-line and started printing. Note: The licensing is such that I can’t sell the design, even if I modify it (which I did because nerds have to tweak everything). If you want your own and have a 3d printer go here. The guy who made the design would probably love a few more hits.
It looks a little goofy but it’s a lot smaller than the big crate.
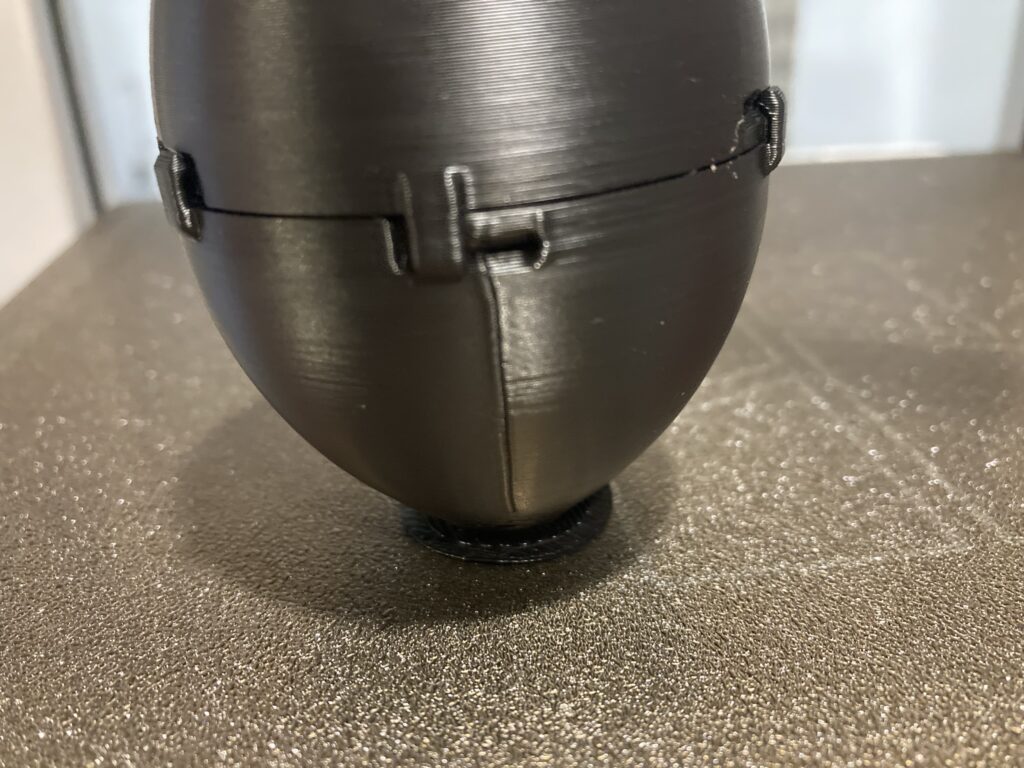
Delightfully, it really is a single egg fortress. I don’t have the right equipment to stress test it. Ideally I’d put an egg in one, hand it to a toddler, and say “carry this to the swing set and back”. Knowing toddlers they’d test the livin’ shit out of it. Even so, it seems excellent. Eight flexible arms on top and bottom cradle the egg. You could probably chuck it off a cliff.
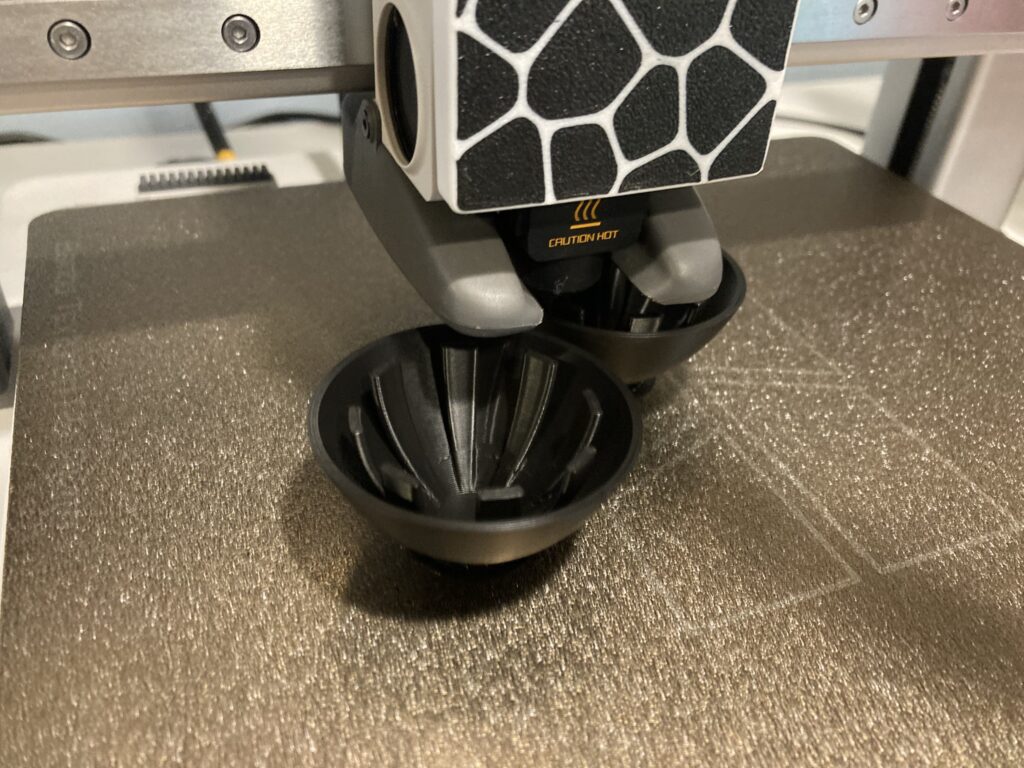
However, I wasn’t satisfied. This is the bottom of one half. The flattish object is called a “raft”. It’s designed to keep the rounded bottom adhered to the print plate. I didn’t like it.
Also the bottom 6mm or so of each half starts narrow and moves wide. This is called “overhang”. 3d printers aren’t great at overhang. Thus, the bottom of the print looks lame. (Still functional, just a little funky.)
Also, every layer of a 3d print has to start somewhere on the perimeter of the object. This is called “seam”. Here the seams are “aligned” and you get that vertical line. It’s merely cosmetic but I wondered if “random” seams would diffuse that line.
The last thing was that they’re hard to grip. It’s an egg shape after all. If I just fished it out of ice water (maybe with numb fingers while winter camping) could I grip it tight enough to twist?
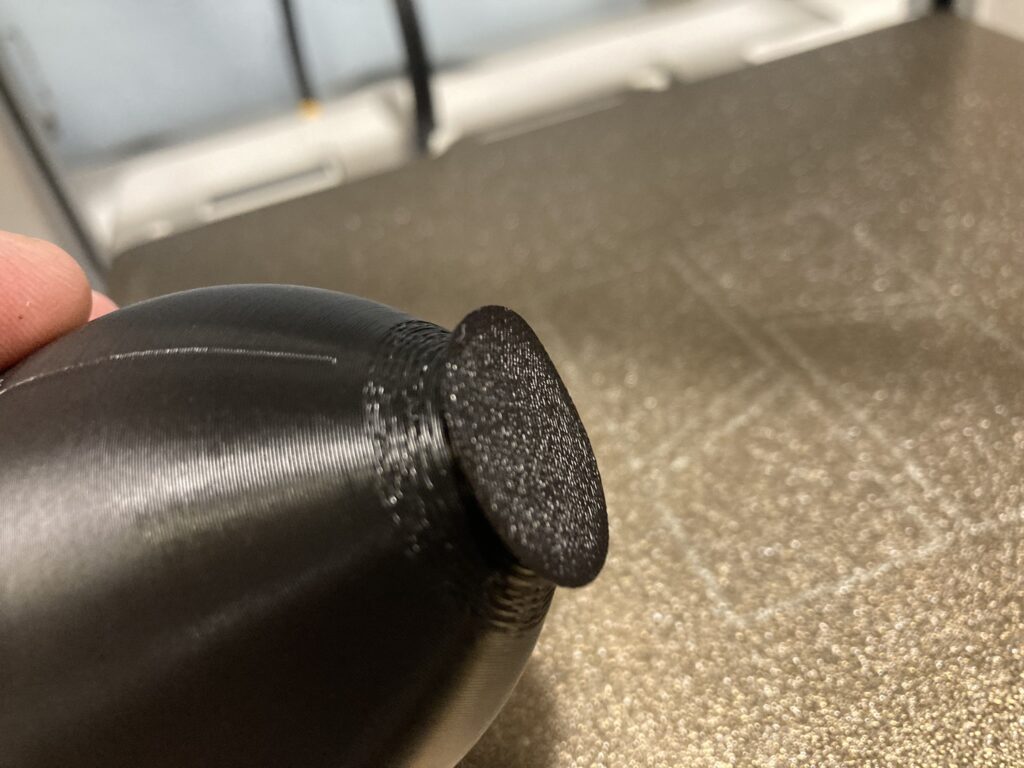
I decided to innovate. In the Bambustudio “slicer” software I created what’s called a “primitive”. Just a geometric shape. I made a flattish square the exact size of the “overhang”. I planned to merge this with the original part so I’d have no overhang and also a nice flat space to grip with my fingertips.
This might fill some of the area necessary for the egg’s volume. So, I added a small cylindrical void into the square. Just enough for the hypothetical tip of the egg. When, I merged the “primitive” with the original part it looked great.
I printed one half with “random” seam and one half with “aligned” seam and compared the two. Both came out pretty good but “aligned” looks better. I also really like my “grip” for twisting them together.
The last step is to switch to a better color. Black looks like I’m making a giant deer turd! (Not that I’ll throw out the two variants I already made.)
By my calculation it’s a fair deal. The oversized egg crate on Amazon is like $9 to hold a dozen eggs. That’s $0.75 per egg.
I’m printing them at $0.60 for each individual locking egg fortress. I’ll send photos of the finished produce when I get a chance.
It’s not like I’m curing cancer, but I’m having fun.
A.C.
P.S. My dumb little “grip” on the top and bottom of the egg fortress gives it a nice flat spot to rest on a tabletop! A fortuitous feature!
Your story, the unpredictable life you’re living right now, has a beginning, middle, and end. A good story may (must!) go off on occasional side quests. The side story isn’t a distraction. It complements the overall whole even if it has a purpose all its own.
What the hell am I talking about? In real life I tried a simple, easy, endurance challenge. All was well until bad weather and an emotional loss torpedoed me below the waterline. I rode it out; exhausted and uncomfortable, tossing and turning, with noisy persistent rain hammering at my squishy wet tent. In this way I mourned my cat.
It’s just a cat. I say that to myself and it’s true. Yet, I’m only human and we humans love our animals. I couldn’t stoically shrug it off. I’m not sure I’d like to be capable of that.
Here’s the backstory, should you be inclined to read it.
Life goes on. I did what I could. I’d gotten some sleep despite the noisy rain. I’d taken decent care of myself. I’d cooked dinner on my campstove. After sunset it stopped raining.
Eventually, I was dry-ish, properly fed, somewhat rested, and sitting by a fire. A low rent Dante Alighieri, I’d made it to the other side.
The night was unusually dark and dismal. I put my lantern on low and rested in the tiny circle of light around the fire. It anchored me in a foggy forest and, metaphysically, a vast universe.
I felt OK. And that’s good enough.
Then the owls came.
Lets talk about owls. No… lets talk about the soul.
Is there a spiritual world? It doesn’t matter what’s out there. There’s one in your mind. You’re human, if there is one you’ll detect it! If there isn’t one you’ll call it into being.
We overclocked apes, homo sapiens, can and must think as built. We understand trajectory, we “get” time, we’re great at making tools, and we wonder what it all means. You don’t have a choice in the matter. You can claim to be a creature of pure logic and reason. You can also put on a fur hat and call yourself a badger.
So there it is. We’re hard wired to experience the spiritual simply by existing. Speaking for myself, I embrace it. Most modern people hate the whole thing. They carefully avoid the merest opportunity to brush against greater truths. People surf social media while taking a shit, lest they have time to think. It’s almost like they fear the inner peace one might develop given minimal self-reflection during a six minute dump.
Enough with the sarcasm. I go to the woods intending to put my mind in order and (ideally) strengthen the soul. I go alone, that’s a heady draught. Facing the universe on its own terms is not easy. But I do dumb shit all the time so it’s fine.
There was nobody around. It was dark as a cave and dead silent.
Then the owls started calling.
I’ve heard owls before. The sound is objectively pretty. It’s also otherworldly. If an owl doesn’t occasionally give you the heebie-jeebies you’re a robot. They’re creepy critters in the best of times. Harbinger of death and all that.
If you’re not familiar with various superstitions about owls, you won’t get it from your Google search. Sit solo on a log in the dark. Stay there until the owls explain it to you. You’ll get it then. Don’t laugh. When’s the last time you meditated on things, silent and alone, unsheltered in nature, in the dark?
Anyway, I don’t fret about the harbinger of death thing. I already know I’m going to die. Nor do I consider the spiritual realm malevolent. But…
The owls surprised me.
At first I heard a single owl species. There was definitely more than one individual. Quite a lot in fact. Taken by itself, it was no big deal.
I didn’t recognize them but I’m not an owl expert. It was just a species unfamiliar to me. Plain “normal owl sounds” with a weird dialect. I wasn’t gross screeching like a barn owl. Nor screech owls (which ironically don’t screech like barn owls). Also, the sound wasn’t as slick and mellow as a great horned owl. Great horned owls are the B. B. King of owls; making exactly the right note, never hurried, always chill.
Whatever I was hearing, they were more numerous than any hooting I’d heard before.
“Nothing too weird about that, just a species of owl that sounds a bit off to my untrained ears. Back to brooding about the nature of the universe.”
So I brooded. Owls have a unique vibe. It’s like they know shit you don’t. I listen carefully; as if I’d understand if I’d just concentrate harder. What would owls tell me that my dense human brain has missed?
I like to hike in the dark and I like to listen to owls. Unfortunately, this night was absurdly gloomy. I couldn’t make it ten feet without light.
I picked up my lantern and shuffled uneasily down a dirt road. It sucked. I kept stumbling. Puddles from the many hours of rain soaked my feet. My lantern was oddly ineffective. My sense of scale was a mess. Was the impenetrable gloom right above me? Fog in the treetops. Or was it far higher? If felt too dank and oppressive to be clouds. My beloved stars were walled off and I resented that.
I started thinking of the ecliptic plane; the flat plane on which the earth and the other planets rotate around the sun. There’s a reason why planets rotate on a shared plane. I don’t know that reason. Nobody thinks about “above” and “below” the plane.
Above me right now, owls were making themselves known; just like I don’t when hunting from a tree stand. I’ve watched deer being incredibly cautious yet completely miss my presence if I’m above their horizon. To them, things above the horizon just don’t exist. Most humans are just as blinkered.
“The axis of our mind is blind to that which is above our ecliptic plane.”
Is that what the owls were saying? I sighed. It was probably a dumb idea. I was missing the point. I don’t buy that harbinger of death thing but I’m open to the idea that there’s an understanding I don’t yet have. Maybe someday I’ll figure it out. Buddha sat under a fig and became enlightened. Newton sat under an apple and came up with calculus. Who am I to wander around the dark forest only to chicken out when the forest spoke aloud?
But I chickened out. My feet were wet. I couldn’t see a damn thing. And I was too sad to go on a spiritual journey. Some things should happen only when you’re feeling optimistic. Cooper scampered into the black lodge without forethought because he let curiosity overcome intellect. I’m just sayin’.
I felt apologetic to nature itself. Whatever I was supposed to learn, I didn’t. As cheeky penance, I composed a haiku.
In the night, owls call.
Join us. See life as we do.
I do not respond.
I was willing to think all the way to ecliptic plane but no further.
On cue, as if I’d personally pissed off the universe, all hell broke loose! Subtle and eerie sounds of normal owls was pushed aside by an unexpected “primate-like” cacophony. It’s North America, we don’t have fuckin’ orangutans!
I tried to sort it out. The first owls kept calling. I guessed they refused to cede territory. Aggressive “primate-like” sounds battled with the gentler “owl hoots”. It wasn’t any night sound I’m used to. Not the long wail of a loon. Not the yip of a coyote. Not the oddly sonic effect of a drumming grouse. Not the commanding howl of a wolf.
Whatever it was, it built up into a heck of a crescendo. I guessed that two species of owl had encountered each other. They sounded pissed off.
At some point you’ve pondered all the creepy owl shit you care to. I stopped parsing sounds.
“Who knows what just happened? For all I know space aliens just captured sasquatch. Only Scooby Doo can solve this case”.
Fuck it. I’m out!
I dumped water on the fire and turned off my lantern. I tripped trying to find the tent in pitch black and was briefly confused by the zipper.
Resigned to deliberately ignoring the damn owls, I climbed into my cot. I was more tired than I knew. I fell asleep almost instantly.
A.C.
Epilogue: I mentioned “there was freaky owl shit going down” and a reader commented about barred owls. He was spot on! That’s what I heard. If you wish to reject my navel gazing as merely “barred owls make bizarre sounds”, have at it.
Here’s a link cued it up to a barred owl’s sound. The narrator even says “the primate-like sounds sometimes freak people out”. Yes, it does!
I met a traveller from an antique land
Who said: “Two vast and trunkless legs of stone
Stand in the desert . . . Near them, on the sand,
Half sunk, a shattered visage lies, whose frown,
And wrinkled lip, and sneer of cold command,
Tell that its sculptor well those passions read
Which yet survive, stamped on these lifeless things,
The hand that mocked them, and the heart that fed:
And on the pedestal these words appear:
‘My name is Ozymandias, king of kings:
Look on my works, ye Mighty, and despair!’
Nothing beside remains. Round the decay
Of that colossal wreck, boundless and bare
The lone and level sands stretch far away.”
John Dryden: 1631-1700
“Coimhéad fearg fhear na foighde”
Beware of the anger of a patient man.
D. H. Lawrence: 1885-1930
I never saw a wild thing sorry for itself. A small bird will drop frozen dead from a bough without ever having felt sorry for itself.
Czeslaw Milosz: 1911-2004
In a room where people unanimously maintain a conspiracy of silence, one word of truth sounds like a pistol shot.