
I’ve been happily distracting myself with my 3d printer. One thing about additive printing is that the top layer of the object* can have funky textures as an artifact of printing. (i.e. The object was printed in a zillion little lines, the lines can make the very top layer of the object’s “layer cake” creation took weird.) This isn’t usually a structural issue, just a cosmetic one.
I was making a print that I wanted to look “pretty”. It had a big flat top so here’s what I did to “spiff it up”:
I delved into “top layer ironing”. The Bambu Studio slicer software (and most of the equivalent slicers I could use) has “ironing” settings. These tell the slicer to perform differently on the top layers. It slows things down, but only on the top layers (you might have as few as one or two top layers so it’s potentially worth it).
In the Bambu Studio software load your objects. Then go into “Quality”. Scroll down to “Ironing”, select “Top surfaces” for ironing type and then you’re stuck choosing details about 5 possible parameters. I selected “rectilinear” as the “Ironing pattern” but after that I was out of knowledge.
I needed to indicate “Ironing speed” (obviously this is the speed of the print head but only during the very top surface) and “Ironing flow” (again the flow for the top layer only). I had no idea what to do.
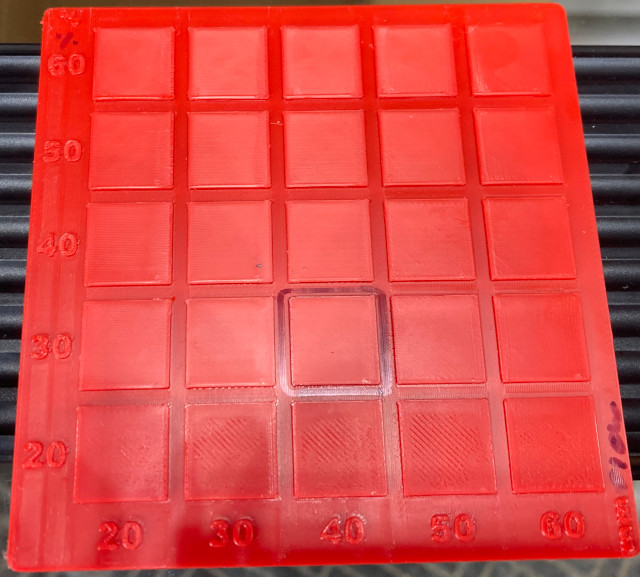
So I downloaded a “test object”. (I found it here.) Someone who’s more experienced than me created a 5 x 5 grid of little flat surfaces (about 1/2″ square). For each square the designer specified a % flow and mm speed. It’s setup with 20, 30, 40, 50, 60 % and the same increments for mm. Thus, a complete sample of all possible options. I would call this an “orthogonal” sample but I’m not sure if that’s the right vocabulary anymore.
The difference between the little 1/2″ squares is very small. More a matter of feel than vision. I selected 30% and 40 mm (it’s circled in marker in the image). The object I made with these settings came out very nice. YMMV.
All in all it was a nice little “science experiment”. I wound up learning how to calibrate my own printer with whatever filament I’ve loaded under whatever conditions I was printing. That’s what I like about 3d printing. It felt good to use real world experimentation rather than just assuming some authority has determined the perfect setting in all situations.
Here’s what my “test” looks like:
A.C.
*The very bottom layer of your object will have a texture determined mostly by the plate upon which you extruded the object. Mine look awesome (at least to my untrained eye). You can buy a zillion plates with a zillion textures (and other features). So far my default OEM plate has served me very well and I haven’t needed or tried other plates.
I want that model to test. Where did you get it? I eventually went with a Bambu X1-C for printing with glass and carbon fiber nylon. It was pretty pricy for starting out but most of my paying jobs need to be made from those filaments. I’ve already got business interest so if I get a good order and I succeed at learning the 3D printing business then it will have paid for itself. I am hopeful. I’ve got one of the grandkids coming for 3 weeks, so this will probably be a 3-D extravaganza. I need a Godzilla model, know of any? I I want to have fun with this thing as well as being serious)
The link to the test is in the post. Maybe you need to be logged into Makerworld to see it?
The X1-C is a lot nicer machine. I can see how the enclosure is key for your plans. And the top mounted enclosed AMS is such a better design than the goofy looking AMS lite. (BTW: The AMS lite functions great, it just looks like something While E. Coyote designed. My only complaint is its exposure to air and silly looks.)
No sign of Godzilla. However I just bought a Cyberbrick kit and made a remote control forklift. For a teenager, the kit might be awesome. (IT’s also awesome for a geezer like yours truly.) For a younger kid the parts will wind up lost in the carpet.
Well sure, the test grid works in practice, but how is it in theory?
Ha ha ha you’ve got the right logic for a career in politics, or academics!